The best height for an LED grow light depends on the fixture you're using, the growth stage of your plants, and the PPFD (light intensity) you're trying to deliver at the canopy. There is no single universal number, but there are reliable ranges you can work from: most modern LED boards and bars hang between 12 and 36 inches above the canopy depending on output and stage, with seedlings needing the most distance and late flower needing the least. Get this wrong in either direction and you end up with bleached tips, stretchy stems, or plants that simply underperform. This guide walks you through how to find the right number for your exact setup and dial it in with confidence.
Best Height for LED Grow Lights: Distance Guide to Avoid Burn

Marcus Rutherford
13 Apr 2026

How to calculate the ideal light height for your specific LED
The cleanest way to find your correct mounting height is to work backward from a PPFD target. Decide what intensity your plants need at this stage (more on that below), then use your fixture's published PPFD map to find the height that delivers it. Every reputable manufacturer publishes photometric data or PPFD maps measured at specific heights. Those numbers are your starting point, not a guarantee, because your tent walls, canopy density, and reflectivity all shift real-world readings.
As a worked example: if you're running a high-output board-style fixture and the PPFD map shows 1,182 µmol/m²/s average over a 4x4 footprint at 18 inches, that's a useful flower-stage data point. If you need less intensity for veg, raise it to 24 or 30 inches or dim it down. The correct fixture height is the one that puts your canopy inside the target PPFD window for that stage, confirmed with a real measurement rather than assumed from a coverage chart.
Dimming matters here too. Correct fixture height is crucial, but it works in tandem with dimmer settings. Running a 600W fixture at full power from 30 inches may deliver the same canopy PPFD as running it at 70% from 18 inches. You have two levers: height and power. Use both. The best workflow is to set a reasonable starting height from the manufacturer's map, measure with a PPFD meter, then fine-tune with the dimmer rather than making dramatic height changes mid-cycle.
PPFD and DLI targets by crop stage

PPFD is the instantaneous intensity reading at the canopy surface, measured in µmol/m²/s. DLI (daily light integral) is the total amount of light delivered per square meter per day, measured in mol/m²/day. The relationship between them is: DLI = 0.0036 × PPFD × photoperiod hours. So if you're running 600 µmol/m²/s for 18 hours, your DLI is 0.0036 × 600 × 18 = 38.9 mol/m²/day. That equation is your planning tool for setting height and photoperiod together.
Knowing your target DLI matters because the same PPFD produces very different results under an 18-hour seedling schedule versus a 12-hour flower schedule. You might need to lower the light or crank the dimmer in flower simply to compensate for the shorter daily window. Height adjustments throughout the cycle are normal and expected, not a sign something is wrong.
| Growth Stage | Target PPFD (µmol/m²/s) | Target DLI (mol/m²/day) | Typical Photoperiod |
|---|---|---|---|
| Seedlings / Clones | 100–300 | 8–15 | 18 hrs |
| Early Vegetative | 300–500 | 20–30 | 18 hrs |
| Late Vegetative | 500–700 | 30–40 | 18 hrs |
| Early Flower | 600–900 | 30–40 | 12 hrs |
| Peak Flower | 800–1,200 | 35–50 | 12 hrs |
| Late Flower / Ripening | 600–900 | 30–40 | 12 hrs |
Cannabis and high-light fruiting crops can push toward 1,200–1,500 µmol/m²/s in peak flower under CO2 supplementation, but that upper range requires verified strain tolerance and good airflow. For most photoperiod grows without CO2 enrichment, 800–1,000 µmol/m²/s at the canopy during flower is a well-supported sweet spot. Understanding which strains are best suited for LED growing also helps here, since some cultivars handle high PPFD better than others.
Distance rules of thumb by LED type
Different fixture form factors spread light differently, which means the same wattage from a quantum board versus a bar-style fixture will hit your canopy at different intensities from the same height. Here are practical starting ranges for common LED types.
Quantum boards and spread-style panels
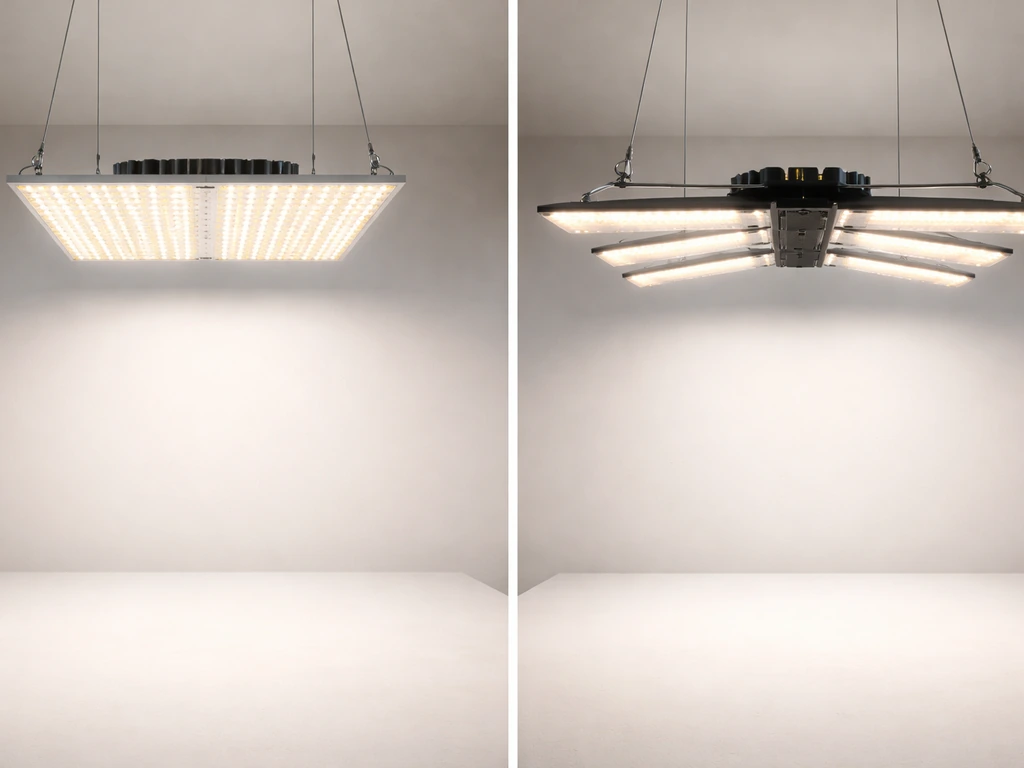
Quantum boards distribute LEDs across a large surface area, which naturally softens intensity and widens the footprint. These are the most forgiving in terms of burning risk at close range. A 200–300W board in a 2x4 tent typically hangs 16–24 inches in veg and can drop to 14–18 inches in flower. A 600W-class board over a 4x4 generally starts at 24–30 inches in veg and moves to 18–22 inches in flower. These fixtures typically use reflectorless, wide-angle LEDs that spread evenly without hot spots.
Bar-style fixtures
Bar arrays (multiple light bars spread across a frame) are designed for maximum canopy coverage uniformity. Because the emitters are spread in a linear pattern, they tend to behave similarly to boards at comparable wattage. A commercial-grade bar fixture rated for a 4x4 or 5x5 footprint typically mounts 18–24 inches above the canopy in flower. Bars shine in uniformity: you'll see much flatter PPFD maps compared to a single-point source. If your manufacturer's map specifies a certain height, trust that number as your baseline and verify with a meter.
Enclosed fixtures and COB-style lights
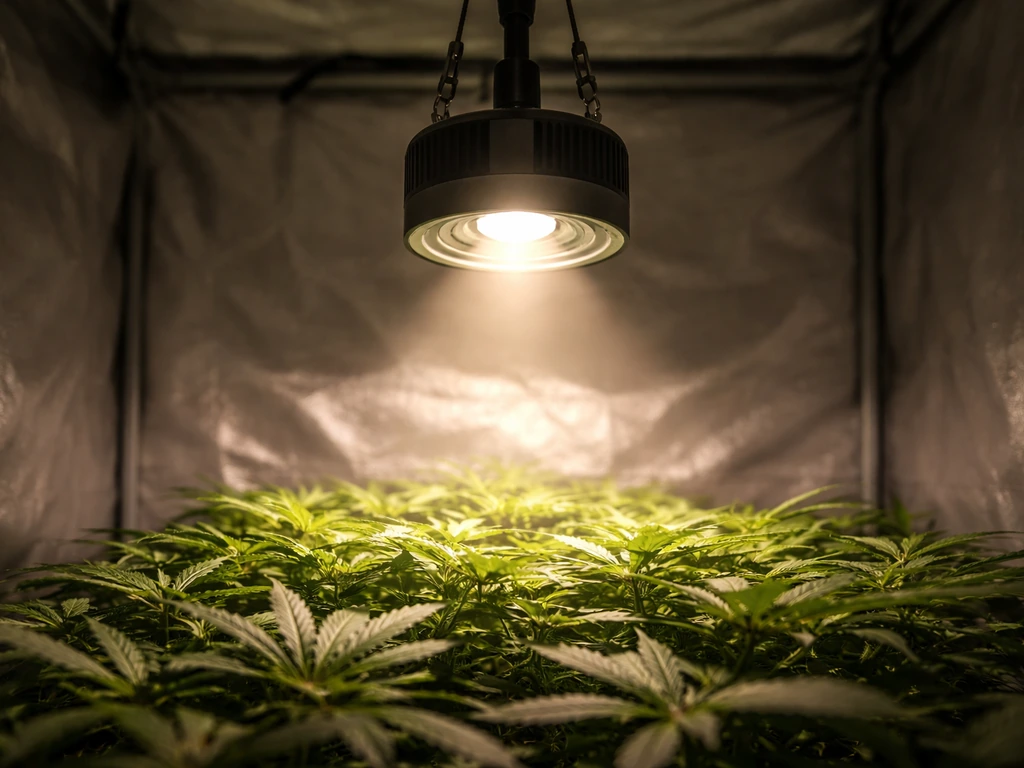
Enclosed LED fixtures and COB (chip-on-board) designs concentrate output more narrowly. They can deliver high PPFD from a greater distance, which means you often need to hang them higher to avoid hot spots at canopy center. COB fixtures are better suited to taller canopies or supplemental side lighting. For a single-COB fixture over a small space, starting at 24–36 inches and measuring is essential before moving closer. High-intensity commercial fixtures (like the examples rated for 2,000+ µmol/m²/s at close range) are genuinely capable of burning plants if you treat them like a spread panel.
Quick reference starting heights
| Fixture Type | Seedling | Vegetative | Flower |
|---|---|---|---|
| Quantum Board (200–400W) | 30–36 in | 20–28 in | 16–22 in |
| Bar Array (400–650W) | 30–40 in | 22–30 in | 18–24 in |
| Enclosed / COB (200–400W) | 36–48 in | 28–36 in | 22–30 in |
| High-Output Commercial (600W+) | 40–48 in | 30–40 in | 18–30 in |
How beam angle, reflectors, and optics change the math
Beam angle is one of the most overlooked variables in hang-height decisions. A fixture with a 120-degree beam angle spreads light much wider than one with a 60-degree lens. Wide-angle fixtures need to be closer to the canopy to maintain useful PPFD levels, but they'll cover more area per vertical foot. Narrow-angle fixtures can maintain intensity from much greater distances, making them better for tall canopies or situations where headroom is limited and you need intensity without getting the light close.
Secondary optics (lenses over individual diodes) tighten the beam and increase peak PPFD at a given distance, but they reduce uniformity. Reflector designs in enclosed fixtures do something similar: they redirect side-emitted light downward, effectively increasing delivered PPFD without changing the LED's raw output. If your fixture uses secondary lenses or an internal reflector, the manufacturer's PPFD map already accounts for this, but you need to hang it at the specified height to match those conditions.
HLG’s published PPFD maps for the HLG 600 RSPEC show measured intensity at specific mounting heights, so matching the stated height is key to reproducing their conditions. Hanging 6 inches lower than the mapped height can push center PPFD well above the edge readings, creating a hot spot.
Thermal design also affects how close you can safely mount. Passively cooled fixtures that rely on heat dissipation through the chassis can radiate noticeable heat downward at close range. Some high-flux fixtures are specifically engineered without active cooling fans to achieve a certain heat profile. Understanding whether your fixture runs hot at close range is a real consideration, especially in a sealed tent with limited airflow. Hold your hand at canopy level for 30 seconds: if it feels like a heat lamp, raise the fixture a few inches.
Spotting and fixing common mistakes
There are three failure modes you'll encounter when height is wrong: bleaching, stretching, and under-lighting. Each has distinct visual signatures and a different fix.
Photobleaching and light burn
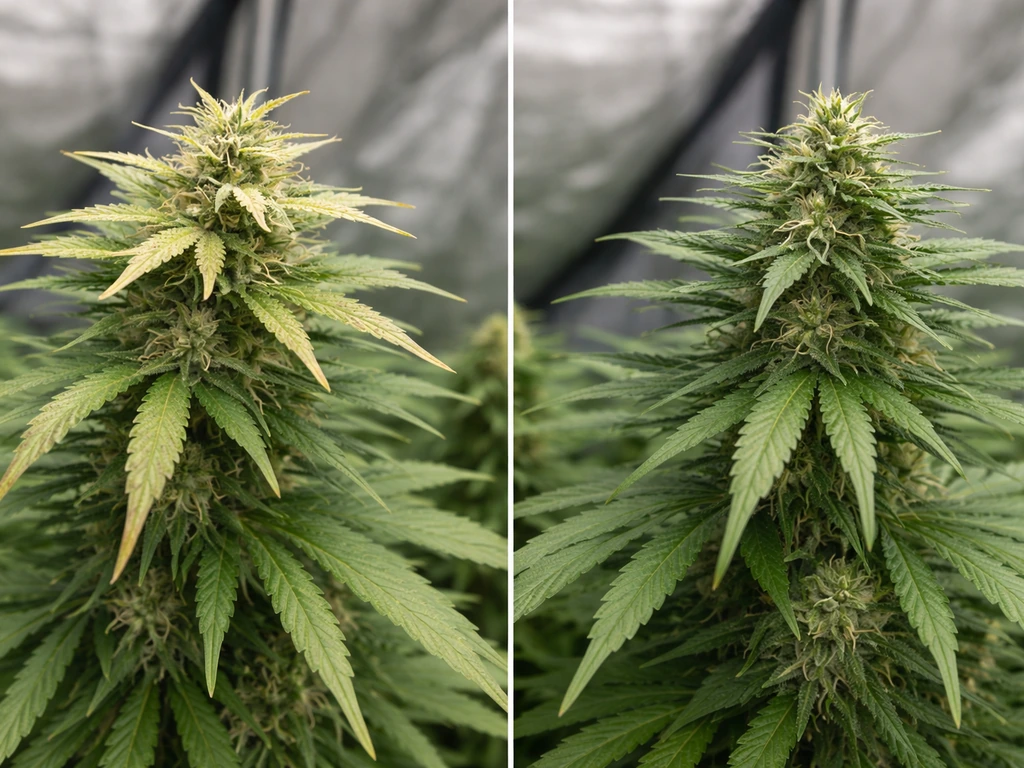
Photobleaching shows up as white or yellow discoloration on the uppermost leaves and bud tips closest to the light. It's caused by intense light damaging photosynthetic pigments including chlorophyll, and it gets worse the longer you leave the light at that height. Reducing PPFD, either by raising the fixture or dialing back the dimmer, stops ongoing damage. Some cultivars can handle PPFD levels approaching 2,500 µmol/m²/s without bleaching under the right spectrum conditions, but for most grows, if you're seeing bleached tips, your canopy PPFD is too high. Pull the light up 4–6 inches and recheck. For growers working closely under powerful LEDs, proper eye protection is also worth addressing before light stress in your plants becomes an afterthought.
Stretching and etiolation
Stretchy, elongated internodes with pale green coloration indicate insufficient light intensity. Plants are reaching toward the light because they're not getting enough photons. If you see this during veg, the light is too far away or underpowered for the space. Lower the fixture incrementally, 2–3 inches at a time, and check again after 48 hours. If you're already at the minimum safe distance and plants are still stretching, your fixture is undersized for the footprint. Addressing which LED components are appropriate for your grow at the hardware selection stage prevents this problem before it starts.
Under-lighting without obvious stretching
The sneaky version of insufficient intensity is plants that look okay but never hit their yield potential. Leaves may show healthy color but the canopy simply doesn't develop density, bud sites stay small, and harvest weight disappoints. This often happens when the light is technically covering the tent but delivering 400–500 µmol/m²/s when 800+ is needed for flower. A PPFD meter catches this immediately. Visual cues alone miss it almost every time.
How to actually measure light at your canopy
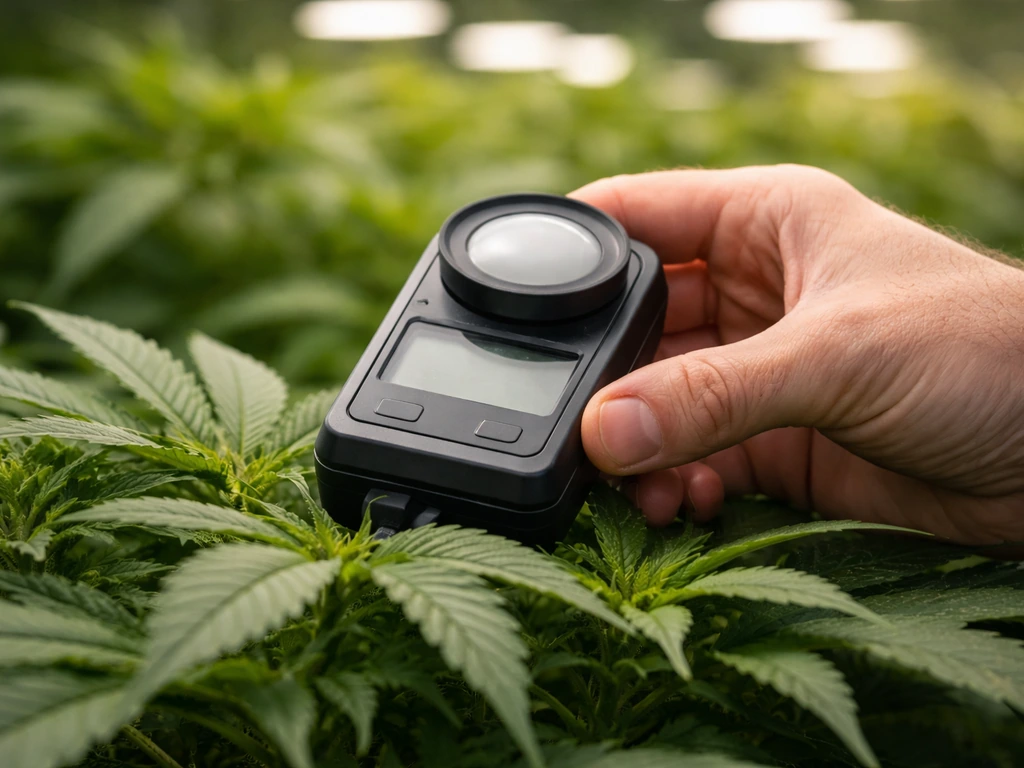
A quantum sensor (PAR meter) is the only reliable way to know what your plants are actually receiving. These sensors measure PPFD in µmol/m²/s and give you a real number to work from. The Apogee MQ-510 is a well-regarded option with a calibration uncertainty of around ±5%, which is accurate enough for practical grow management. Apogee’s MQ-510 full spectrum quantum meter lists calibration uncertainty of ±5%, aligning with this accuracy for practical grow management [Calibration uncertainty of around ±5%](https://www.
apogeeinstruments. com/mq-510-full-spectrum-quantum-meter-with-underwater-sensor/). Place the sensor face-up at canopy height, directly under the light, then take readings at several points across the canopy: center, each corner, and the midpoints of each edge. A good fixture should have less than 20–25% variation across the target footprint.
One thing to watch with any quantum sensor: cosine response and sensor orientation matter. Hold the sensor level and parallel to the canopy surface. Tilting it toward the light source will inflate the reading. The sensor is calibrated assuming light arrives from overhead at a perpendicular angle, so a consistent flat-hold technique keeps your measurements comparable across sessions.
If you don't own a PPFD meter yet, visual cues are a backup, not a replacement. Healthy deep-green leaves, tight internodal spacing in veg, and dense lateral branching suggest adequate intensity. Pale undersides on lower leaves often indicate the canopy is blocking too much light from reaching depth, which is a canopy management issue rather than a height issue. For serious dialing, investing in a quantum sensor and pairing measurements with the right red-to-blue spectrum ratio for your stage gives you full control over what your plants receive.
Mounting setup, coverage, and safety
Even coverage starts with centering the fixture over your canopy. In a rectangular tent like a 2x4 or 4x8, a single centered fixture will always have stronger intensity at the center than at the edges. Spreading output with a bar array or multiple smaller fixtures helps flatten this gradient. Check your canopy corners with the PPFD meter: if the center reads 900 and the corners read 500, that's a large uniformity gap that will show up as uneven development.
Use adjustable rope ratchets rated for at least double the fixture weight. A 5-pound LED fixture should hang from hardware rated to 10 pounds minimum. Most tents have a crossbar weight rating printed in the manual; respect it. If you're running multiple fixtures, distribute the load across multiple bars and check that connections are tight before every cycle.
Timers are not optional. Running lights manually leads to inconsistent photoperiods, which stresses photoperiod plants and confuses auto-flowering strains that need consistent DLI. Use a mechanical or digital timer, double-check the schedule when you change stages, and confirm the timer is actually firing by checking the light 15 minutes after the scheduled on-time. Heat management inside the tent is directly tied to fixture height: the closer the light, the more radiant heat the canopy receives.
Keep inlet and exhaust airflow active during the light period, and verify that tent temperatures stay below 82°F (28°C) at canopy level. Pairing good light intensity management with the right nutrients for LED growing rounds out the environmental control picture, since LED-grown plants often have different nutrient uptake patterns than those grown under HID.
Quick tuning workflow for tents of different sizes
Here's the practical sequence to set up and dial in any LED fixture in a tent, regardless of size.
- Find your target PPFD for the current growth stage using the table above.
- Pull the manufacturer's PPFD map for your fixture and identify the height that delivers your target PPFD over your tent footprint.
- Set the fixture at that starting height using adjustable rope ratchets, centered over the canopy.
- If your fixture has a dimmer, start at 75–80% power for your first measurement session.
- Measure PPFD at 9 points across the canopy: center, four corners, and four edge midpoints.
- Compare your center reading to your target. If it's more than 15% high, raise the fixture 2–3 inches or reduce power. If it's low, lower or increase power.
- Check uniformity: if the center-to-corner difference exceeds 30%, consider whether the fixture is correctly sized for the footprint or whether a second fixture would help.
- Lock in the height, record the setting, and recheck at the start of each new growth stage.
- As plants grow taller and the canopy rises, adjust height to maintain consistent distance, not just absolute height from the floor.
Common tent sizes and practical notes
| Tent Size | Recommended Fixture Type | Flower Height Range | Key Consideration |
|---|---|---|---|
| 2x2 | 100–200W board | 14–20 in | Headroom is tight; dimming is essential |
| 2x4 | 200–300W board or bar | 16–22 in | Single fixture works; check corner uniformity |
| 3x3 | 250–400W board or bar | 18–24 in | Center-heavy boards benefit from slight raise |
| 4x4 | 400–600W board or bar array | 18–26 in | Measure all 9 points; uniformity matters here |
| 4x8 | Two 400–600W fixtures | 18–26 in | Space fixtures evenly; check overlap zone PPFD |
| 5x5 | 600–800W bar array | 20–28 in | Bar arrays outperform boards for uniform coverage |
In a 4x4 tent with a mid-range 450W bar fixture, a reasonable starting workflow looks like this: hang at 24 inches in early veg at 60% power, measure center PPFD (target 400–500 µmol/m²/s), confirm corners aren't below 300. Transition to flower: lower to 20 inches, increase to 85% power, verify center PPFD hits 800–1,000 µmol/m²/s. If plants show any bleaching on upper colas mid-flower, raise 2 inches before touching the dimmer. If they show stretching in week 2, lower 2 inches or bump power up 10%. Record every change and the PPFD reading that prompted it, so you build a dialed profile for that fixture in that tent.
Where to go from here
Start with the manufacturer's PPFD map and set your first height based on those numbers. Measure with a quantum sensor as soon as plants are under the light, and don't wait for symptoms to tell you something is wrong. The PPFD reading is faster and more accurate than any visual cue. Once you have a baseline reading dialed in for each stage, you'll find the cycle runs smoother, yields improve, and problems become easier to trace back to their actual cause rather than guessing at light distance.
The two adjustments that solve 90% of height-related problems are: raise or dim for bleaching, lower or increase power for stretching. Everything else is refinement. As you get more comfortable with PPFD targets and your specific fixture's output, you'll naturally start thinking in terms of DLI, adjusting photoperiod and intensity together to hit your daily totals. That's where consistent, repeatable results live.
FAQ
If my LED is at the “right” height, do I need to adjust it as the canopy grows?
No, the same hang height usually does not work when the canopy height changes. Re-measure PPFD when the plants gain height, especially during the week after the flip to flower, because canopy density and leaf angle also change how much light actually reaches your targets.
What if my center PPFD is correct but the corners are too low or too high?
For a single fixture in a tent, the center will almost always read higher than the edges, even if the fixture is the correct height. If your corners fall outside your target PPFD window, you may need to raise the average target height slightly, use a different fixture layout, or add a second fixture rather than only changing dimmer.
How does beam angle change the best height for LED grow lights?
Your beam angle matters most when you notice hot spots, sharp discoloration near the hottest regions, or strong center-edge PPFD variation on the meter. Narrow-angle fixtures often need less height reduction than wide-angle units to keep intensity without burning the middle.
Why does lowering the fixture sometimes cause bleaching even when the average PPFD seems okay?
Do not assume that “closer equals more.” If your fixture has a secondary lens or internal reflectors, small height changes can cause a center peak jump while edges stay similar. Use the manufacturer’s mapped height as the baseline, then adjust in small increments (about 1 to 2 inches) and confirm with spot readings.
Can I have “enough” PPFD at the top but still be under-lighting the lower canopy?
It is possible, because uniformity and canopy penetration are separate issues. A canopy can show healthy color on the surface while deeper layers underperform, so measure at multiple points and consider checking within the canopy (or at least the lower-leaf level) to catch shading problems.
What should I check first if my plants are stretching and the leaves look pale?
If you see stretching plus pale color, that points to insufficient PPFD at the plant level, not a minor height mismatch. First confirm you are using the correct PPFD target for the stage, then verify actual delivered PPFD with a meter, since visual cues can be misleading when nutrition or watering stresses plants.
Do I need to change height when I change photoperiod, or is dimming enough?
Yes. Switching from one growth stage schedule to another often changes total daily light (DLI). Even if you keep the same hang height, you may need to dim up or down and adjust photoperiod so your daily totals stay in range, not just your instantaneous PPFD.
When is the best time to take PPFD readings after adjusting height or dimmer settings?
Measure after the plants have had time to acclimate to the new setting, but do not wait days to verify. A practical approach is: change height or dimmer, let lights run at least 30 to 60 minutes for stabilization, then take readings across the canopy and record them for later comparisons.
How can I prevent PPFD meter readings from being wrong?
Yes. Cosine response and sensor orientation can inflate readings if the sensor is tilted toward the light. Keep the quantum sensor level and parallel to the canopy, and avoid taking “one number” readings, instead capture center, edges, and corners.
Is it possible that my plants are burning from heat rather than light intensity?
Timelines and temperature are linked. If you lower the fixture in a sealed tent and plants start showing stress faster than expected, re-check canopy-level temperature and airflow, because higher radiant heat can compound light stress. A small height change can significantly change canopy heat load even when PPFD is only slightly different.
How do I know when the problem is fixture size or spacing, not hang height?
If the fixture is undersized for the footprint, you will never get uniform PPFD just by changing height. The meter will show large center-edge gaps no matter what you do, which usually means you need a wider fixture, more fixtures, or a different layout.
Why do I get inconsistent results even when I think I set the right height?
For auto-flowering crops, inconsistency in photoperiod can affect behavior, but even aside from that, inconsistent timing changes daily totals. Always confirm the timer is actually switching the power on, then recheck PPFD after any stage transition or dimmer change.
What should I do if I cannot reach the target PPFD at the lowest safe height?
If your measured PPFD is consistently lower than the target at every reasonable height, do not keep dropping the fixture. Instead, increase fixture power, add another light, or revise the layout. Dropping can create center hotspots while still not meeting the target at corners, so uniformity checks are essential before making big moves.
Next Articles
What LEDs to Use for Grow Lights: A Practical Guide
Learn which LED types power grow lights and how to choose the right spectrum, coverage, and specs for your setup.
Best Full Spectrum 1000W LED Grow Lights: Buyer Guide
Buy the best full spectrum 1000W LED grow light with spec-to-decision tips on PPFD, coverage, wattage, and tent fit.
Best 100W LED Grow Light: How to Choose the Right One
Choose the best 100W LED grow light with PPFD coverage, spectrum, efficiency, dimming, heat, and setup tips.